Wednesday 23 February 2022

java.io.IOException: org.eclipse.aether.deployment.DeploymentException: Failed to deploy artifacts: Could not transfer artifact Return code is: 400, ReasonPhrase: Repository does not allow updating assets: releases.

 HI,

by Default in Nexus release branch will not allow redeploy of the Same version of Talend job.

if we need to redeploy same job again into release branch do the below configuration


1. login into Nexus

2. go to Repositories

3. selecet Releases

4. change the deployment policy to allow redeploy.


Thanks,

Jilani Syed

Sunday 20 February 2022

Error Line: 1 Detail Message: The type java.lang.Object cannot be resolved. It is indirectly referenced from required .class files

 Generally this JRE issue in Talend .

Talend Studio will point wrong JRE path. we need to point right JRE in Talend studio.


Solution: Check your java version  and point to the right version in talend

java -version


2. we need to point Java 11 folder in installed in Talend

Studio-->windows-->Prefence-->Java-->InstalledJRE

Point JDK 11 home folder


Thanks

Jilani Syed


Sunday 17 May 2020

MYSQL CDC with Apache Kafa, Debezium and Talend

Hi,

In This blog I would like to explain capture change data from MySQL Database by using Kafa, Debezium plugin, and Talend.

Flow Diagram


The Debezium Mysqlconnector will connect MySQL server binlog file capture the changes on Table and produce the changes to Kafa Topic.
We can implement a Talend job to consume the changes and Sync with target databases.
Now we can see the configuration.

Install Debizeum MySQL Connector on Windows.
 Here I am doing all the configuration on windows. it is very simple. please follow the below steps.

1. Download and install the Kafka and zookeeper. select BInary download method.
https://kafka.apache.org/downloads.
Here I have used Kafka2.11-2.10 version this folder contain zookeeper also. so I no need to install zookeeper separately.

2. Download Debezium Myconnector plugin.  and Extract into a folder.


3. Download and install Mysql Server. I already MySQL 8 version in my system.

4. Start the Zookeeper server.
       open the command prompt and move to the Kafka folder and execute the below command. so the default zookeeper port is 2181.
 C:\kafka_2.11-2.1.0>.\bin\windows\zookeeper-server-start.bat .\config\zookeeper.properties.
check the zookeeper server status you can see the below message.

5. Start the Kafka server.
       open the command prompt and move to the Kafka folder and execute the below command. so the default Kafka port is 9092.
 C:\kafka_2.11-2.1.0>.\bin\windows\kafka-server-start.bat .\config\server.properties
check the Kafka server status you can see the below message.

6. copy all Debezium connector jar files to the Kaka lib folder.


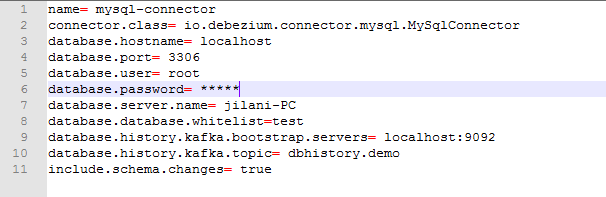
7. Create properties file in the config folder of Kafka with Debezium connector configuration parameters. the Debezium connector requires information to connect MySQL database like host, username, port, Database, and topic name. we have other parameters also for that you need to read Kafka connect.
for now use the properties to connect MySQL.

8. Start Kafa Connect
    Open the command prompt and move to the Kafka folder and execute the below command. Here Kafa Connect we can use Port 8083 to check the connector configuration and status.
C:\kafka_2.11-2.1.0>.\bin\windows\connect-standalone.bat .\config\connect-standalone.properties .\config\connect-Mysql.properties

If the connector configuration success the first time Debezium connector applies snapshot on your specified Database and create the topics in Kafka. the topic names will create in the below format.
Database.server.name.Dtabase.name.tablename.
Ex: in My case "jilani-PC.test.Customer".


9. Check the connector status by using http://localhost:8083/connectors/mysql-connector/status
     Response should be like this
   "name":"mysql-connector","connector":      {"state":"RUNNING","worker_id":"192.168.56.1:8083"},"tasks":[{"state":"RUNNING","id":0,"worker_id":"192.168.56.1:8083"}],"type":"source"}

10. check the list of topics created 

Kafka-topics --zookeeper localhost:2181 --list

11. test the scenarios.
Consume any one topic from the above topics, I would like to do the changes on the customer table will consume the messages from "jilani-PC.test.customer".
Run the Kafka consumer on the above topic to watch the messages.

C:\kafka_2.11-2.1.0\bin\windows>kafka-console-consumer.bat -bootstrap-server "localhost:9092" -topic "jilani-PC.test.customer" -from-beginning.

if we change the customer table the changes need to sync with the customer_sync table.
check the customer table and customer_sync table both are empty.


Create a Talend Job to consume the message from Kafka and insert or update or delete the data into the Customer_Sync table.


Insert Record:

let's insert a record in the customer table the same record should insert into the Customer_Sync table.


Update Record:
let's update a record in the customer table the same record should update into the Customer_Sync table.

Delete Record:
let's delete a record in the customer table the same record should logical delete (update the flag to 'd') into the Customer_Sync table.
Thanks
Jilani Syed

Tuesday 3 September 2019

How to configure Implicit context in Talend With Encrypt and Decrypt the password values


Context variables:

Context describes the user-defined parameters that are passed to your Job at runtime. Context Variables are the values that may change as you promote your Job from Development, through to Test and Production. Values may also change as your environment changes, for example, passwords may change from time to time.

In Talend context variables can create two ways
  •  Local variables:  create in job level that are only used in the corresponding job. 
  • Global variables: create in Talend Repository that are used in throughout project

How can we pass the Values for Context variables? 
  •   We can hardcode the values in Talend.
  •   We can use tContextLoad component in each job t get the values from file.

And we have one more way to pass the values for context variables in Talend Project. i.e. implicit context


How to configure implicit context in Talend?

We can configure implicit context with files or Database. If you use file or database we need to have two Main columns i.e. key and value.

If you use table for maintain context variables. Just create a table with two columns i.e. key and values.

CREATE TABLE `tbl_implici_context` (`key` varchar (255) DEFAULT NULL, ‘value` varchar (255) DEFAULT NULL) ENGINE=InnoDB DEFAULT CHARSET=latin1;

The charset should be latin1 because it should accept all special characters.

 Generally the most of the customer Expect to maintain security on their values. So they don’t want expose their application passwords. So they need to encrypt all the passwords.

So while loading all variables and values all values for password fields should be encrypted. For this Encryption I have used database encryption algorithm.

i.e. AES_ENCRYPT and AES_DECRYPT

Create a Talend job to populate the implicit context table. For this use case I have taken tFixedflowInput component as source.


 Use tJavaRow1 component to generate insert statement

if(input_row.key.matches(".*password.*"))
{
context.username= "insert into tbl_implici_context values('"+input_row.key+"',AES_ENCRYPT('"+input_row.value+"','mykeystring'));";
System.out.println(context.username);
}
else
{
context.username= "insert into tbl_implici_context values('"+input_row.key+"','"+input_row.value+"');";
System.out.println(context.username);
}


Use tMysqlRow component to execute this insert statement


Run the Job


Check the Results


Configure implicit context in project settings with Decrypt the password values.

In Talend StudioàProject settingsà Job settings


In the Query section we should use the Decrypt methods. Here I have written one Query to decrypt the passwords.

Generally the Query condition option only take where clause.

"`key` not like '%password%'  union  select `key`, case when `key` like '%password%' then AES_DECRYPT(value,'mykeystring') else value  END value  from test.tbl_implici_context"
****************************THANK YOU******************************

Thursday 9 May 2019

GC Overhead limit Exceeded in TALEND JOBS

In Many Talend jobs we face this issue when our job reach maximum memory.
we can resolve this issue by adding the JVM parameter(-XX:-UseGCOverheadLimit) in Talend run Job settings.

refer the below screens


Saturday 9 February 2019

How to install Talend BPM on Tomcat


 How to install Talend BPM on Tomcat

1.       Download ApacheTomcat6  zip folder from the following web site.
Unzip into a folder and use this path as <TOMCAT_HOME>
2.       Download server files
In the bundle section on the page, download the deploy zip for your version
3.       For Talend 5.3 we need to download  BOSVersion5.10 i.e BOS-5.10-deploy.
4.       Unzip the file into the folder of your choice.
This location path will be referenced as <Talend BPM-DEPLOY> in the installation guides.
5.       Copy Talend conf folders
copy <Talend BPM-DEPLOY>\conf\bonita to <TOMCAT_HOME>\bonita
copy <Talend BPM-DEPLOY>\conf\external to <TOMCAT_HOME>\external
6.       Copy BPM Execution Engine libraries
·         Create a folder <TOMCAT_HOME>\lib\bonita.
·         Copy all *.jar files from
·         <Talend BPM-deploy>\bonita_execution_engine\engine\libs
·         <Talend BPM-deploy>\bonita_execution_engine\bonita_client\libs
·         NOTE: Please overwrite duplicate files if any.
7.    Modify <TOMCAT_HOME>\conf\catalina.properties  by adding ${catalina.home}/lib/bonita/*.jar to the property common.loader
Result:
common.loader=${catalina.base}/lib,${catalina.base}/lib/*.jar,${catalina.home}/lib,${catalina.home}/
lib/*.jar,${catalina.home}/lib/bonita/*.jar

8.       Deploy User Experience web application (*.war file)
Copy
<Talend BPM-5.3 DEPLOY>\bonita_user_experience\without_execution_engine_without_client\bonita.war
to
<TOMCAT_HOME>\webapps

Important for Talend BPM: Remove the jdtcore*.jar file
To do this, open the bonita.war file (using an unzip tool) and remove jdt-core*.jar from the WEB-INF/lib folder.
9.        Define system variables
To configure Talend, system variables need to be defined. To do that, use a setenv script.
                For Windows:
 create <TOMCAT_HOME>\bin\setenv.bat to set variables:
Copy the following content into setenv.bat file and save it.
@echo on
rem Sets some variables
set BONITA_HOME="-DBONITA_HOME=%CATALINA_HOME%\bonita"
set LOG_OPTS="-Djava.util.logging.config.file=%CATALINA_HOME%\external\logging\logging.properties"
set SECURITY_OPTS="-Djava.security.auth.login.config=%CATALINA_HOME%\external\security\jaas-standard.cfg"
set JAVA_OPTS=%JAVA_OPTS% %LOG_OPTS% %SECURITY_OPTS% %BONITA_OPTS% %BONITA_HOME% -Dfile.encoding=UTF-8 -Xshare:auto
-Xms512m -Xmx1024m -XX:MaxPermSize=256m -XX:+HeapDumpOnOutOfMemoryError


10.   Finally Go to <TOMCAT_HOME>\bin  click on startup.bat to start the tomcat server.


No w the Tomcat server started .
While starting  tomcat first time all the bonita tables created respective Datasource like h2or mysql or sqlserver.


11.   Default it integrated with h2 databse.
If we want we can configure any one of the Datasource by configuring properties files
12.   Login
Access the login page at http://localhost:8080/bonita and the use the admin default account ("admin"/"bpm") to login.


Tuesday 17 April 2018

JDBC Java Program to connect HIVE Database with Kerbose authentication

Hi

This article Explains to you how to write a JDBC program to connect Hive with Kerbose Authentication.

Here writing Java program is very simple and easy you can see the java code Below.
But I have struggled to get all the support jar files. here I have attached the lib file folder you can use directly.


Java Code:
=====================

import java.sql.*;
import java.sql.Statement;
import org.apache.hadoop.security.UserGroupInformation;

public class test {
  public static void main (String args[]) {
    try {
      org.apache.hadoop.conf.Configuration conf = new org.apache.hadoop.conf.Configuration();
      conf.set("hadoop.security.authentication", "kerberos");
     // conf.set(name, value);
   
      UserGroupInformation.setConfiguration(conf);
      System.out.println("started");
      UserGroupInformation.loginUserFromKeytab("cloudera@quickstart.cloudera", "keytabpath");
      Class.forName("org.apache.hive.jdbc.HiveDriver");
      System.out.println("getting connection");
      Connection con = DriverManager.getConnection("jdbc:hive2://quickstart.cloudera/default;principal=hive/_HOST@quickstart.cloudera;");
      System.out.println("got connection");
   
      Statement stmt = con.createStatement();
    String tableName = "testHiveDriverTable";
    stmt.execute("drop table if exists " + tableName);
    stmt.execute("create table " + tableName + " (key int, value string)");
      con.close();
    }
    catch (Exception e) {
      e.printStackTrace();
    }
  }
}
Download the source code and jar

java.io.IOException: org.eclipse.aether.deployment.DeploymentException: Failed to deploy artifacts: Could not transfer artifact Return code is: 400, ReasonPhrase: Repository does not allow updating assets: releases.

 HI, by Default in Nexus release branch will not allow redeploy of the Same version of Talend job. if we need to redeploy same job again int...